ThinkInReact
A tutorial to understand how to think up and develop ideas using React
![]()
A tutorial to understand how to think up and develop ideas using React
Before you start, this is not a step-by-step tutorial to obtain a functional result but raises the idea in the bases fundamentals of web development using React and proposing small code snippets to help the reader understand.
Index
- Introduction
- Requirements
- Learning to design
- About tutorials and documentation
- Choose then embark
- Why React
- Example Case
- Thinking in React
- Bringing it all together
- Appendix
Introduction
We’re all optimists in our profession or we’d be forced to shoot ourselves. Joshua Bloch
Year after year, the web community has gained followers and although this is not a science, nowadays entering the world of web development has never been so easy (and so complex at the same time). The main idea of this tutorial is not to teach you how to create, but how to think so that you can later create.
In terms of decisions and techniques, it has never been so difficult to choose one that is adapted to those we are really looking for, without first finding twenty similar alternatives that, at first sight, are adapted to what we were looking for from the beginning, but without first taking the wrong step: we must understand that each one exists as a result of a problem that is alien to our reality. That is why one must first interpret where one stands and then begin to develop an idea and turn it into reality. Increasingly in the world of development, many at the first distraction divert attention from what is really worthwhile.
From the idea to the materialization of the product, the main objective is lost and is replaced by a hybrid between: the best development environment that can be found, the decision on which is the best? and the final understanding of the why? of our idea.
Many questions for a person who is just starting out and wants to get started with web development. That’s why I’m writing this article, for those who are looking to start developing but don’t know where or those people who feel overwhelmed (like I did) by the amount of information going around on the Internet (besides the bias that exists depending on what pages one visits regularly).
Without further ado, let’s get started…
Without further ado, let’s get started…
Requirements
To follow this tutorial we will need, first of all:
- Pencil and Paper
- Preferred text editor (In my case, I will use Visual Studio Code)
- Node.JS installer (We will show you how to install it in the appendix)
- Knowledge of OOP languages
- Knowledge about Entity Modeling
- Basic computer knowledge
Learning to design
First of all, we must be clear about two things and, along the way, disprove common myths:
Programming is a relatively simple task
As far as programming is concerned, we have to understand and stop seeing it with fear since it is not a complex task if we are talking about developing a web application. Practically all the information we need already exists and it is a matter of accurate searches to find what we are looking for. A mental exercise, quite fun in fact, is trying to develop an application without throwing any line of code at the computer. You will find that it is more plausible than we think and practically the trends of the last times with tools like GTP-3 (its applications), Figma, InVision, etc, revolve around providing the user with a visual or descriptive way to develop what we have in mind. Starting from a sketch or a description of the functionality we are looking for and obtaining a functional interface is no longer an obscure science and these applications can even obtain the resulting code from these bases.
To think and design from start to finish, an application, is a monumental task
This is where automation begins to fall apart. No machine can understand what we think with the same clarity and interpretation. The ability to understand what people want is what sets us apart from computers and that’s why our job is not to program but to design solutions that make life a little easier than it was yesterday.
About tutorials and documentation
“Nobody ever figures out what life is all about, and it doesn’t matter. Explore the world. Nearly everything is really interesting if you go into it deeply enough.” Richard Feynman
Many times, one gets confused between the coming and going of pages in an obscure documentation that contributes little to our cause so we choose to follow a tutorial and understand how a person, step by step, explains how to do what we seek to do. The problem with this is the following: Following steps doesn’t help much if you’re starting up, because it puts us in a comfortable place where we believe and normalize that things are done in a way, following a recipe of steps, where if we skip one we can’t go back and complete what we’re looking for.
Note, this does not mean that the guided tutorials do not help, they help, the only problem is that they normalize the help. That’s why to read documentation we have to sit in front of our computer screen, within the documentation page of our chosen tool and spend an hour understanding the structure of what we are about to use to build what we are looking for.
It happens that one looks for a specific tutorial of something specific and then try to change that is almost utopian so we end up tied to borrowed structures, wasting time modifying things that from the moment zero were intended for a different problem.
Tutorials are useful, don’t think not, but to understand the potential of a tool and not to generate useful code ready for production. That’s why in this tutorial we are not going to follow steps but tips, useful for those who are starting to decide what to use to build their ideas.
Choose then embark
Tools, styles, patterns, differences there are. The problem, most of the times is to choose wrong and end up adapting what we do according to the tool we have. Beyond technical limitations, it is interesting to understand that when our problems are constantly being modified and limited by the tools we choose to solve them, we are clearly facing a bad choice of tool.
Understanding the how is a constant struggle between the tool we use and the agnostic theory and applying just this “how to do it” to our problem and turning it into a useful solution is a complex issue. That’s why for this tutorial, I’m going to present a limited use case, a problem with its respective solution, so that we can understand the how and the why of React as a web development library.
Why React
After playing with several tools, from Angular to Razor Views from .NET I can’t get rid of the simplicity that React provides when it comes to connecting: thinking with design.
React presents us with the unique opportunity to forget about the question How to do this in this tool and ask ourselves How to design this using React?
A very interesting book, design oriented and that I recommend to learn to think about the user first is Design of Everyday Things by Don Norman.
Example Case
The system that we are going to propose to design in this tutorial is based on a small computer system, capable of updating study curricula to keep the other schools synchronized and in this way, the students can consult them and stick to a study path to follow, without the need to attend a specific school.
Note: I strongly recommend that you design your own data model, without clinging to the one we will use in this tutorial, in order to practice reasoning beyond text compression.
Taking into account the case study above, we can infer that there are four entities in our system:
- Curriculum
- Student
- Professor
- School
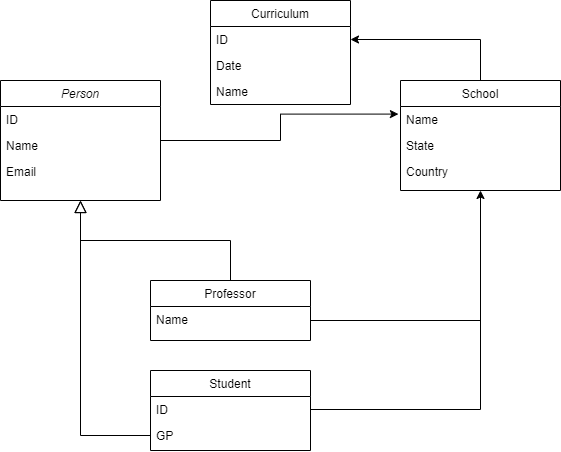
Obviously we are simplifying the situation and taking it to the ideal, where there are no more relationships than those in the diagram.
Then, converted to code, we can obtain the different classes of each one of the entities, although in this case we will be centered only in a single one (Person, Student) for then begin to explain the why of React in this example
export class Person {
	constructor(ID, name, email){
		this.ID = ID,
		this.name = name,
		this.email = email
	}
}

export class Student {
	constructor(person, GP, professor){
		this.person = person,
		this.GP = GP,
		this.professor = professor
	}
}
class
It is important to understand that classes structure how data will be displayed, understood and manipulated later in the system. That is why it is very important to define well the schemes and structures that will take our data. Here we can observe that a Student basically corresponds to a Person, and I want you to keep that relationship in mind, because we are going to start building our idea based on this relationship.
Thinking in React
React (obviously turning a blind eye to the whole history of web development) and its management virtual DOM, our tool chosen to materialize our idea and turn it into a solution. If you have come this far you may ask yourself why we designed our data first, and the answer is simpler than it seems, simply because designing saves us time. From the moment zero we know how will be the form of our entity person, we understand as Person and Student behave and also, as if it were not enough, we have the data that these entities will contain within our application. Now, what role plays React in all this?
According to the official website of the tool,
React helps you create interactive user interfaces in a simple way. Design simple views for each state in your application…
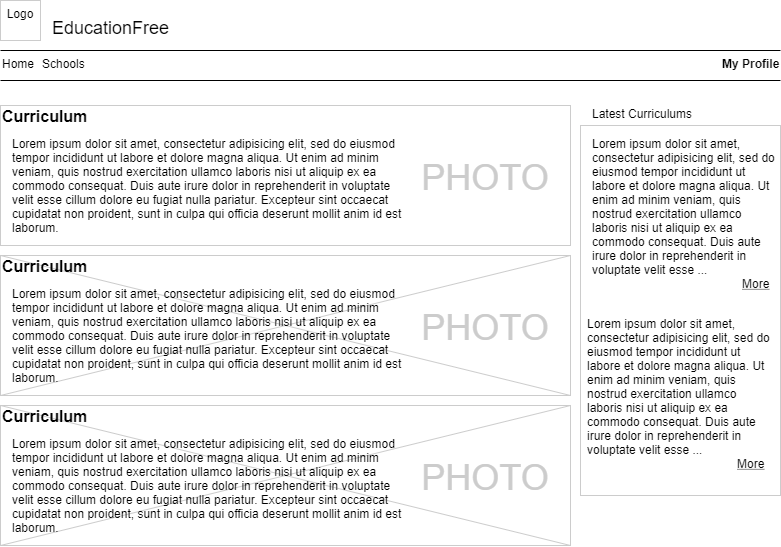
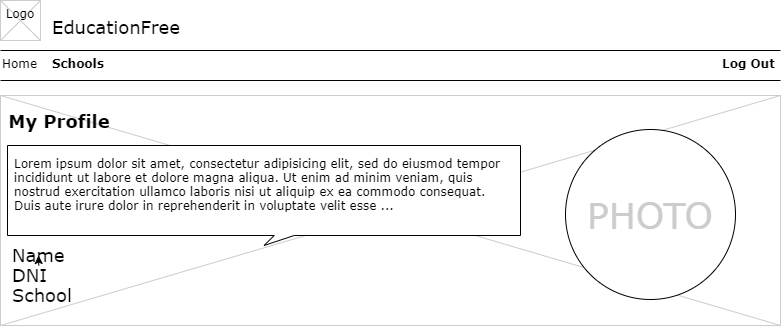
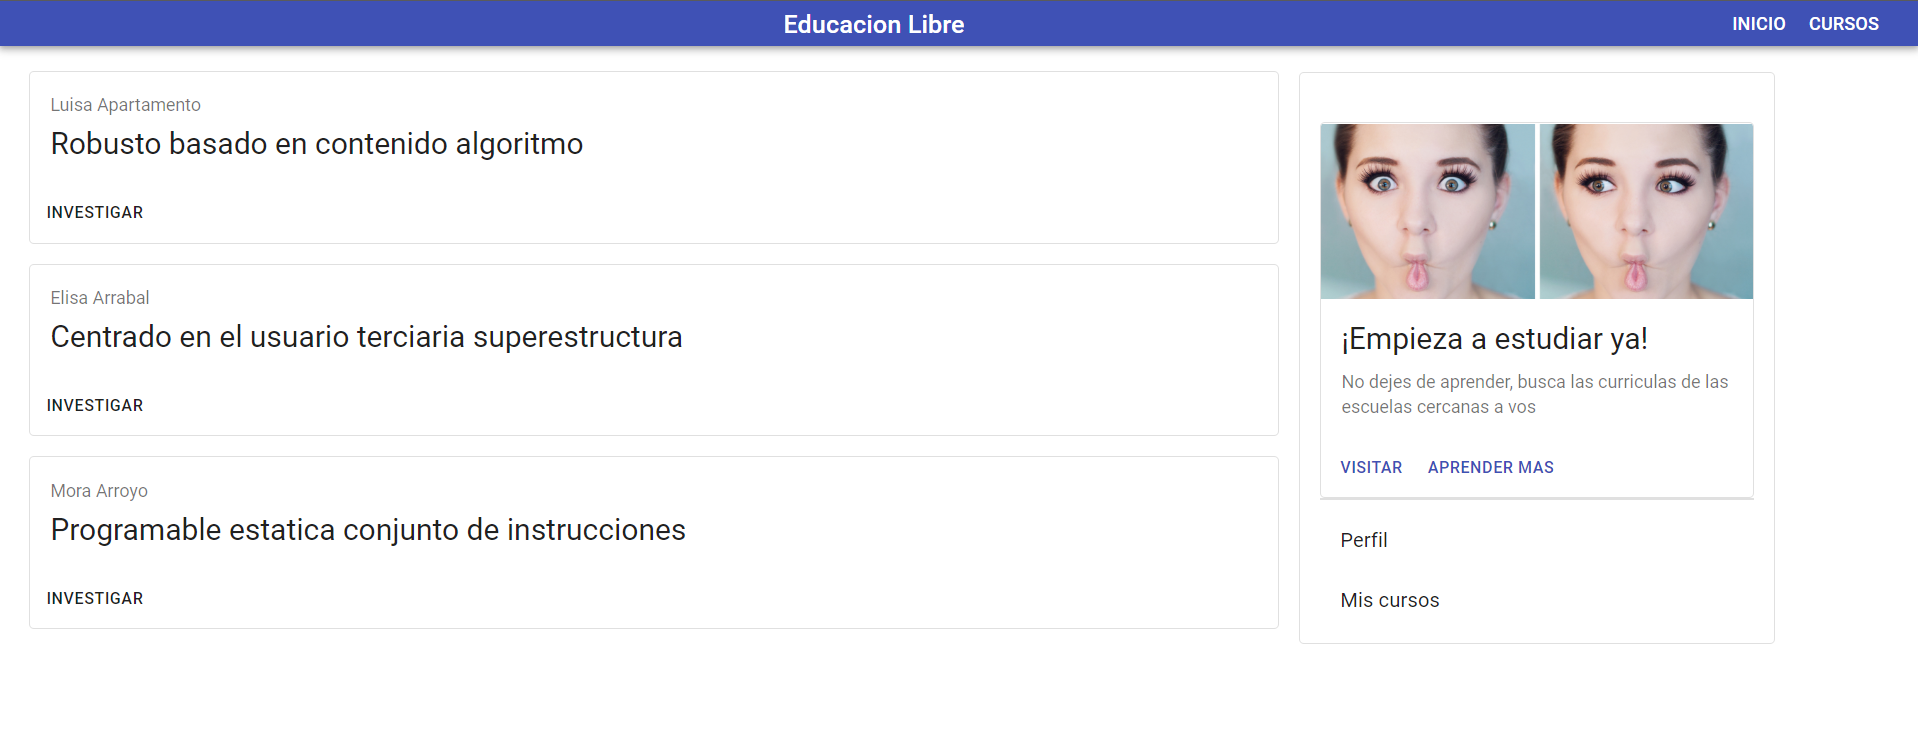
By analyzing the sentence, we can make an inference and relate our models to what React understands and interprets, interfaces. Then, we take the pencil and paper (which were as requirements) and sketch what would become what the person sees in the application when he is a student, his profile and the home page:
Home Page
User Profile
We already have the structure of the application, how it will be diagrammed and how the application will be for the end users. Now let’s start to dismember our sketch and understand several essential concepts of React (in my opinion, one of the most important).
Components
To really understand how React works we have to understand what the components are, and for that, what better than to show it through an example:
Going back to the previous image, the student’s user profile. Seeing the image, I propose that you do the mental example of dividing by functionalities the image, ie, divide by blocks each part of the image and understand that corresponds to that in terms of functionalities.
React has the simplicity of being able to “separate” visual contents and transfer them easily to code.
We start with the profile overview and as we can see, there is a logical split between the page header and the student information

Now, imagine as if we were looking at the sketch, but in layers, the first layer, let’s call it layer zero, represents an overview of the sketch, the most superficial division of functionality that encompasses similar functionality. Now, looking at the image, we can see that we clearly have two new divisions: UserProfile and Navigation** (the names should be consistent with the encompassing functionalities to increase scalability and code maintenance).
Perfect, iterating over the divisions, independently of each other, we obtain more and more parts in question belonging to these logical parts of the application.

By transposing the previous images to something closer to the code, we can obtain a tree structure like the following one:
ProfileView {
	Navbar : [
		Header : [
			Logo
		],
		Menu
	],
	UserProfile : [
		UserData,
		UserPicture
	]
}
This iteration exercise on the design can be done over and over again, following the pseudo code:
1. dividing logical functionalities
2. name all divisions with a descriptive name
3. take an object, evaluate if there are divisions to be made:
	2.1 if there are, go back to step 1 with the object as a whole and start from scratch
	2.2 if not, consider the component as a whole
4. if there are no more elements, finish dividing
Once we finish the division of logic within our view, we proceed to create the components, as they are represented in the tree.
- In this tutorial we will use the new nomenclature of components from React 16
- JSX and why we define the objects this way in React
Definition of Components
To define a component in React using functional components
const FunctionName = (parameters) => {
  //functionality
};

function FunctionName(parameters) {
  //functionality
}
Both are correct and equally valid.
Then defining the structure of our application for the Profile View, we obtain:
import NavBar from './src/components/Shared/NavBar';
import UserProfile from './src/components/Perfil/UserProfile';

const ProfileView = () => {
	return (
		<>
			<NavBar></NavBar>
			<UserProfile></UserProfile>
		</>
	);
};

const UserProfile = () => {
}

const NavBar = () => {
}

export default ProfileView;

(you can see the hole structure on /src/components)
In this way, we can say that we ground the visual to the code, that is to say, everything that exists inside the Navigation and UserProfile files, will be shown thanks to the ViewProfile component, and wherever we call the ViewProfile component, there will be and will be shown the components that lie inside.
Properties
What happens when we want to communicate a message to a component? Let’s imagine the situation where a Student, in his profile, wants to change his username. Understanding this example, we can see that the user name lies in the logical section now called UserData (looking at the diagram) saying this: we have to identify now, the properties of our components. As we did with the components, we can do the same with the properties that will exist within each of the components.
But first, what are the properties?
According to React, properties are nothing more than arguments that are passed to our functions.
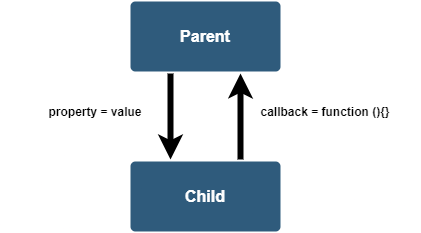
Clarifying and bringing down this definition a little bit abstract, we can say that properties are values with which an object communicates, upwards or downwards, to persist a type of state, with its children (inner components) and with its father (component that encompasses it). And if, technically they are an argument that is passed inside a function and to use them we can take the following example code, in which a father creates a son and gives him a name, to understand later how the communication between components using properties works:
Downward communication (parent to child)
We can define new properties by adding values to the form:
<Component prop1="test" prop2="tutorial" prop3={key:value}></Component>
And we can send virtually any type of object supported by the JavaScript execution engine we’re using, so to communicate with a parent’s child components, we do the following:
function Parent(props) {
  return (
    <>
      <Child name="Jeremias"></Child>
    </>
  );
}

function Child(props) {
  console.log(this.props.name); //me
}
Communication upwards (child to parent)
It is a little more complex and does not work through direct values but through the so-called callbacks, which are simply functions that are called from the child but whose execution context exists in the parent:
function Child(props){
	if(this.props.name == 'Jeremias'){
		const valueForTheParent = 42;
		this.props.callback(valueForTheParent);
		//CallbackFunction will exist in the parent and we will call it from the Child
	}

function Parent(props){
	const CallbackFunction = (value) => {
		console.log(value) // 42
	}

	return (
		<>
			<Child name='Jeremias' callback={CallbackFunction}></Child>
		</>
	);
}
Seen graphically we can see something of the way:
It is important to understand that to share properties through many objects it is not necessary to send them as properties, in fact this is a bad practice and is called Prop Drilling. That’s why, there is something called Context, which simply encompasses a set of states and then invokes it without the need to pass everything as properties to the objects.
States
The states in React are values that a component can take and exist within it, they are not provided by anyone outside. For example, the component Student can take different state values for an internal property, and these values can alter and/or decide their behavior when shown in our application. There are ways to handle states but in this tutorial we will use the Hooks
Bringing it all together
A practical example to understand how to start designing using React
Now yes, let’s get to work, we are going to take to real and functional code the idea of the educational system that we commented and used as an example before.
First of all we are going to create a new directory inside an empty folder in our operating system and run the command (before this, see Appendix) to generate the initial configuration file of Node.JS
npm init --y
After this, a new file will be reflected in our directory called package.json. This file is essential to understand modern web development and I recommend the following article to understand it in depth. But to simplify it is the one in charge of the packages and configurations to run our application.
Once the initial configuration file is generated we will proceed to use create-react-app. To do this, after installing Node.JS on your computer we will proceed to fire the command npx
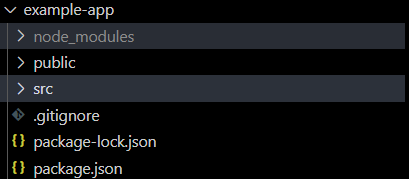
npx create-react-app app-example
This, within the directory where we are, will generate a starting point to start developing. create-react-app will create a set of packages, configurations and files that will make our lives easier to learn how to develop using React.
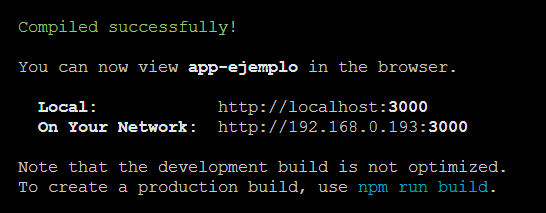
You can move to the app-example folder created by the command and run npm start to run our first React application and then access it through the url provided in the console
It is possible to use React from different entry points: from a NPM package (Node package manager) to a CDN included in an HTML file
Once inside, after entering our application (entering the local address shown in the console after running npm start), we will find a screenshot of our website.
You can read and I invite you to do so within the directory react-example/app-example within the repository. Try to understand the metamorphosis of the objects we designed at first (/src) and then observe the real implementation within our web application.
A few final clarifications
- To generate the information in the application we use Faker.js
- For the link between the components and the web addresses (UserProfile corresponds to the url http:localhost:3030/profile, for example) we use React-Router
- For the visual styles, I decided to use Material-UI given the ability to speak in the same terms as React and not lose the idea of the tutorial to focus on a design one.
Finish to start
A personal advice, which in my personal experience served me well, is to try to understand a tutorial not as a succession of things served on a tray to be consumed, but a way to understand what a tool is capable of. That’s why I encourage you to go through repositories that interest you to start reading code. It is important to understand that the learning process is not magic but neither is following recipes. It is an interesting balance between: designing, thinking and implementing, where ideas are prioritized over the tools we choose to think in order to be able to. At the end of the day, the tools exist and the respective manuals accompany them. Beginning in web development consists mostly of reading documentation, understanding what a tutorial wants to show us and understanding the path a guide wants to show us. It is important and necessary to understand that without our ability to think, there is no tool that will save our lives.
I hope that this tutorial was not more than a long list of tutorials but something you can understand with pleasure and share with those people who are trying to understand the flow of information of these days and go to develop something on their own.
Luckily, and so far, the knowledge is shared. Thanks for reading, Ignacio
Appendix
How to install Node.JS
- Go to Node.JS site and download any stable (LTS) version of Node.JS environment.
For those who do not know, Node is an execution environment, which allows us to run JavaScript outside the context of a browser. It is based on the JavaScript V8 engine designed by Google